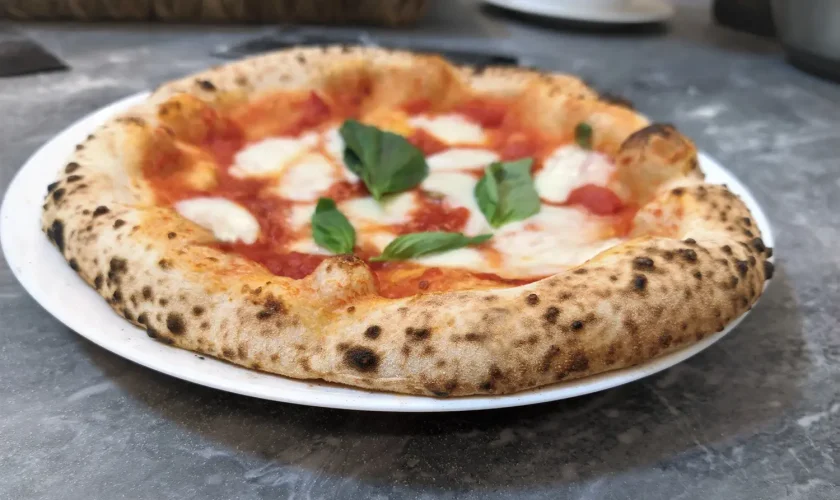
Walk into any venerated pizzeria along the Via dei Tribunali in Naples, and you will encounter a culinary dance governed by extreme physics. Inside a dome of hand-built refractory brick, hardwood burns down into an incandescent bed of embers. The internal air temperature hovers near 900 degrees Fahrenheit, while the floor stones radiate heat at roughly 800 degrees. An experienced pizzaiolo slides a dressed disc of dough onto the hearth, and within sixty to ninety seconds, magic happens. The outer rim balloons into a puffed, airy crown, scorched with leopard-spotted blisters, while the center remains tender, pliable, and moist.
Recreating that experience inside an American home kitchen presents an immediate, stubborn obstacle. The average residential oven tops out between 500 and 550 degrees Fahrenheit.
When home cooks attempt to bake a strict, traditional Neapolitan formula—consisting strictly of Italian Type 00 flour, water, sea salt, and yeast—in a 500-degree oven, the results are almost universally disappointing. Because the oven is hundreds of degrees colder than a wood-fired dome, the pizza requires six to eight minutes to bake rather than ninety seconds. Over that extended exposure to dry heat, moisture leaches out of the crumb. Instead of a cloud-like, bendable crust, you end up with a pale, dry, cracker-like disc that is tough to chew and lacks aromatic complexity.
Achieving authentic Neapolitan character at home does not mean abandoning tradition. It means understanding the science of thermal transfer and re-engineering the dough formula to compensate for the limitations of domestic heat. With strategic adjustments to hydration, fermentation, and thermal conductive surfaces, you can produce a pizza with an explosive, blistered cornicione and a tender interior right from a standard kitchen range.
The Physics of Thermal Transfer: Why the Rules Must Bend
The classic regulations governing true Neapolitan pizza were written for an environment with immense thermal energy. In a 900-degree oven, heat transfers through three simultaneous mechanisms: conduction from the volcanic floor stone, convection from rolling currents of hot air, and intense radiant heat bouncing off the low, curved ceiling. Water inside the dough flashes into steam instantaneously, stretching the gluten matrix before the proteins fully set.
In a conventional home oven, radiant heat is weak, and hot air circulates sluggishly. To bridge this energy deficit, the dough formula must be modified in three specific ways: higher hydration, the inclusion of fat, and the addition of complex sugars.
Elevating Hydration to Combat Moisture Loss
Traditional Neapolitan dough operates at roughly 58 to 62 percent hydration. In an ultra-hot oven, this relatively low water content works because the bake time is so brief that internal steam cannot fully escape.
In a domestic oven, where the pizza must bake three to four times longer, low hydration guarantees a desiccated crust. To keep the interior crumb tender while the exterior browns, raise the hydration level to 67 to 70 percent. This extra reservoir of liquid protects the gluten network from drying out, allowing the interior of the cornicione to remain custard-soft while the outer shell develops a crisp, delicate shatter.
The Heresy of Olive Oil
In Naples, adding oil to pizza dough is considered sacrilege. In a home kitchen, it is an absolute necessity.
Fat functions as a tenderizer and an insulator. A modest addition of high-quality extra virgin olive oil coats individual gluten strands, inhibiting excessive cross-linking and keeping the baked crust supple. Furthermore, fat slows the evaporation of water during an extended six-minute bake and encourages surface browning at temperatures where lean doughs remain stubbornly pale.
Encouraging Low-Temperature Browning
Wood-fired ovens create charred blisters through direct contact with blistering refractory clay and licking flames. At 500 degrees, the Maillard reaction moves slowly.
Incorporating a small percentage of diastatic malt powder or unrefined honey introduces simple sugars and active enzymes. These compounds accelerate caramelization, allowing the crust to develop rich, complex amber tones and deep savory flavor notes without having to stay in the oven so long that it turns into zwieback.
Flour Architecture: Selecting the Proper Grain Profile
Many home bakers assume that buying an authentic bag of imported Italian Tipo 00 flour will automatically solve their problems. In a home oven, standard Tipo 00 flour can actually work against you.
Tipo 00 refers exclusively to the grind of the flour, indicating that the wheat has been milled to an ultra-fine, powdery extraction with the bran and germ entirely removed. Most traditional Italian 00 flours are unmalted. They are designed for wood-fired ovens where temperatures exceed the scorch point of malted grains. When baked at 500 degrees, an unmalted 00 flour produces a crust that looks chalky and tastes underdeveloped.
For domestic baking, the ideal grain bill falls into two categories:
-
Malted Bread Flour: High-quality American unbleached bread flour typically contains between 12.5 and 13.5 percent protein and comes pre-malted with barley flour. The added enzymes break down complex starches into fermentable sugars, promoting vibrant browning and delivering the structural strength required to support high hydration.
-
The Hybrid Blend: For the quintessential balance of crispness and tenderness, blend 70 percent high-protein bread flour with 30 percent Italian Tipo 00 flour. The bread flour provides the structural backbone and browning capacity, while the 00 flour softens the chew and delivers that classic silky, extensible mouthfeel.
The Master Formula: 68-Percent Hydration Cold-Ferment Dough
This formulation is designed to yield four 260-gram dough balls, the optimal size for ten-to-eleven-inch pizzas on a standard domestic baking stone or steel.
Baker’s Percentages and Gram Weights
-
Bread Flour (or 70/30 blend): 600 grams (100%)
-
Water (lukewarm, roughly 75 degrees Fahrenheit): 408 grams (68%)
-
Fine Sea Salt: 17 grams (2.8%)
-
Extra Virgin Olive Oil: 15 grams (2.5%)
-
Diastatic Malt Powder (or mild honey): 6 grams (1.0%)
-
Instant Dry Yeast: 1.8 grams (0.3%)
Step-by-Step Mixing and Autolyse
Begin by whisking the flour and malt powder together in a large mixing bowl. In a separate vessel, dissolve the instant yeast into the water. Pour roughly ninety percent of the water mixture into the flour, reserving the rest.
Mix by hand or with a sturdy wooden spoon until no dry pockets remain. The mass will look shaggy and unrefined. Cover the bowl with a damp towel and let it sit undisturbed for thirty minutes. This brief pause, known as an autolyse, allows the flour starches to fully hydrate and initiates enzymatic activity without the tightening interference of salt.
After the resting period, dissolve the sea salt in the remaining water and pour it over the dough alongside the olive oil. Knead the dough inside the bowl, squeezing the mixture through your fingers until the slippery liquid is fully incorporated.
Transfer the dough to a clean work surface. Work it using the slap-and-fold method for five to seven minutes. Because the dough sits at 68 percent hydration, it will feel sticky at first; resist the urge to add raw flour. As the gluten network aligns, the surface will transition from textured and slack to smooth, supple, and elastic. Shape it into a tight boule, cover it inverted with the mixing bowl, and rest for twenty minutes.
The Fermentation Timeline
Perform two sets of stretch-and-folds spaced twenty minutes apart. To do this, reach under one side of the dough, pull it upward to extend the gluten without tearing it, and fold it over the center. Rotate the bowl ninety degrees and repeat three more times.
Place the smooth dough into an oiled container, seal it tightly with a lid, and let it ferment at room temperature for two hours to jumpstart yeast activity. Then, move the container directly into the refrigerator for 48 to 72 hours of cold fermentation.
During this extended cold retard, yeast activity slows to a crawl, but lactic acid bacteria and endogenous enzymes continue working. They dismantle complex starches into flavorful sugars and break down tough gluten proteins into pliable, extensible strands. This slow biochemical transformation produces the deep, slightly tangy flavor and airy crumb structure associated with world-class pizzerias.
Portioning and Final Proof
Four to five hours before you plan to bake, pull the cold dough from the refrigerator. Divide the bulk dough into four equal portions weighing approximately 260 grams each.
Shape each piece into a taut ball by cupping your hand around the dough and dragging it across an unfloured counter, using the natural friction of the surface to pull the outer skin tight. Place the balls into a lightly oiled dough proofing box or onto a rimmed baking sheet dusted with semolina flour. Cover them tightly with plastic wrap to prevent a dry skin from forming.
Allow the dough balls to come to room temperature and proof until they have roughly doubled in volume and rebound slowly when gently poked with a fingertip.
Preferments for Explosive Lift: The 100-Percent Poolish Option
If you want an even lighter crumb with voluminous air pockets, consider building your dough around a poolish—a wet, equal-parts flour and water preferment fermented with a trace amount of yeast.
To integrate a poolish, mix 200 grams of your total flour, 200 grams of water, a pinch of yeast, and five grams of honey sixteen hours before your main mix. Let it sit on the counter at room temperature. By morning, the preferment will be frothy, domed, and rippling with tiny bubbles.
Whisk the poolish directly into the remaining water and oil, then incorporate the rest of the flour and salt. The organic acids developed in the poolish weaken just enough of the gluten to create extraordinary extensibility. When this dough hits a hot surface, the trapped gases expand rapidly, yielding an ethereal, blistered cornicione that practically melts in the mouth.
Shaping Technique: Protecting the Internal Gas Matrix
How you open a dough ball determines whether your crust emerges light or dense. The cardinal rule of artisanal pizza shaping is simple: never use a rolling pin. A rolling pin crushes the delicate pockets of carbon dioxide that your yeast spent days creating, forcing all the gas out through the edges.
Dust your work surface with a fifty-fifty mix of all-purpose flour and coarsely ground durum semolina (semola rimacinata). Semolina acts like microscopic ball bearings beneath the dough, allowing it to glide effortlessly off the peel without sticking.
Place a proofed dough ball into the flour blend, coating both sides. Using the pads of your middle three fingers, press firmly into the dough, starting roughly one inch away from the top edge and working downward toward the bottom.
Do not touch the outer rim. Leave that one-inch perimeter completely uncompressed; this preserved border will become your cornicione. Flip the dough over and repeat the pressing motion on the reverse side, pushing air from the center into the edges.
Pick up the flattened round and drape it over the backs of your hands, keeping your knuckles positioned just inside the puffy rim. Gently rotate your hands in a circle, letting gravity pull and stretch the dough outward. The center should become translucent, while the border remains thick and airy. Transfer the shaped round directly to a lightly dusted wooden pizza peel.
The Heat Hack: Maximizing the Domestic Setup
To mimic the intense conductive heat of a wood-fired hearth, your equipment setup must maximize thermal density. Traditional cordierite pizza stones are adequate for bread, but they conduct heat too slowly for Neapolitan-style pizza.
The Baking Steel Advantage
Invest in a quarter-inch or three-eighths-inch thick baking steel. Steel features a volumetric heat capacity comparable to stone, but its thermal conductivity is roughly eighteen times higher. When a wet, high-hydration dough lands on preheated steel, energy transfers into the raw dough instantly, creating an explosive burst of bottom crust oven spring.
Positioning and the Broiler Technique
Set your baking steel on the second rack from the top of your oven, roughly six to eight inches below the upper broiler heating element.
Preheat the oven to its absolute maximum temperature—typically 500 or 550 degrees Fahrenheit—for a minimum of sixty minutes. The steel requires a full hour of thermal soaking to absorb and store maximum energy.
Ten minutes before you slide your first pizza into the oven, switch the oven from standard bake to the high broiler setting.
This preheats the steel even further while turning the top heating elements glowing red. When you launch the pizza onto the steel, the bottom crust is seared by intense conduction, while the top of the pie is blasted with direct radiant heat from the broiler element.
Keep the broiler on throughout the bake. Within two minutes, the top crust will bubble and blister. Rotate the pizza 180 degrees using a metal turning peel or tongs around the three-minute mark to ensure even coloring. In roughly four to five minutes, the pizza will emerge with charred blisters, melted cheese, and a crisp, pliable base.
The Path to Mastery
Making exceptional pizza at home is not a matter of luck or mystical secrets. It is a systematic practice of observing how ingredients respond to heat, time, and mechanical manipulation.
By increasing hydration to shield against dry heat, incorporating olive oil and malt to promote suppleness and browning, and pairing a long cold ferment with a scorching baking steel, you dismantle the limitations of the domestic oven. What comes out of your kitchen will not be a pale imitation of Naples—it will be an authentic, blistered triumph of modern food craft.